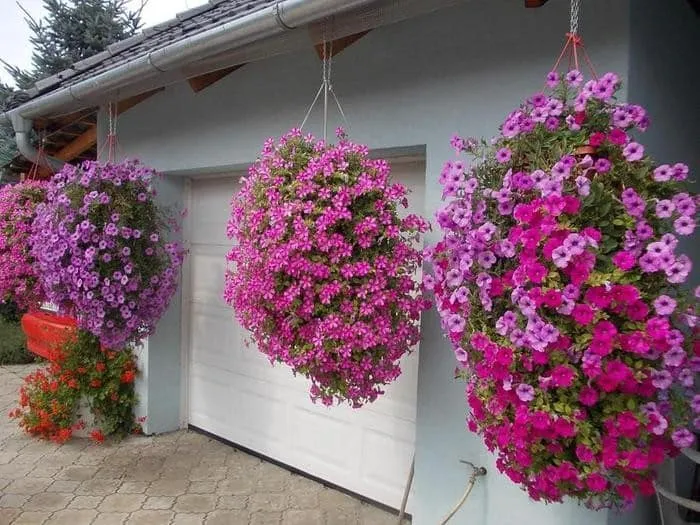
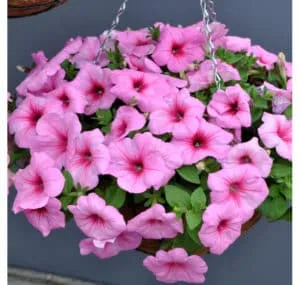
Trailing petunia is the leader among garden flowers. The bushes bloom in a lush cascade, delighting with bright colours and easy care. The plant loves pruning and frequent watering, blooming profusely and for a long time. Here’s how to grow trailing petunias: pinching and other care rules.
Table of contents
Basic care rules for trailing petunias
Trailing petunia is an undemanding plant that delights with abundant flowering. There are several varieties of the flower: Supertunia, Surfinia, Tumbelina, and Fortunia. Growing this beauty is not difficult if you follow the planting and care rules.
Planting
The plant is mainly grown in hanging pots and garden boxes. Before transplanting petunias to their permanent location, seedlings are grown, which can be obtained either from seeds or cuttings.
Petunia seeds are tiny, so sowing them is a task for patient gardeners. Successful growth depends on the quality of the seeds and subsequent care. It is important to maintain optimal humidity and temperature in the room. For favourable growth, the air temperature should be +23…+24°C. At lower temperatures, seedling growth stops; at higher temperatures, the sprouts dry out. Sowing is done in February.
The planting procedure is divided into several stages:
- The seedling substrate is generously watered with a light pink potassium permanganate solution. Peat tablets or ready-made potting mix from a garden store are suitable for planting.
- Seedling boxes are filled with moist soil, and the seeds are sown on the surface. A 0.5 mm layer of soil is sprinkled on top, and the container is covered with film or glass. The boxes are placed on a shaded windowsill and left like this for 10–14 days. The cover should not be removed, and the moisture from watering will be enough for the future seedlings.
- After the first sprouts appear, the cover is removed, and the seedlings are fertilised with potassium-based fertilisers during watering. Water is poured through a sieve or spray bottle. The ventilation time for seedlings is gradually increased by 5–10 minutes. The cover is completely removed after the first leaves appear.
For cuttings, a strong and healthy mother plant with plenty of buds is needed. The procedure is carried out in late winter when the plant is dormant. In late August, all long shoots are cut off, and the pot with the plant is placed in a cellar or another room with a temperature no higher than +4°C. The plant is supplemented with a grow light, creating an artificial daylight duration of 12–16 hours. In January, the plant will begin to wilt—this is normal. In spring, it will produce new young shoots.
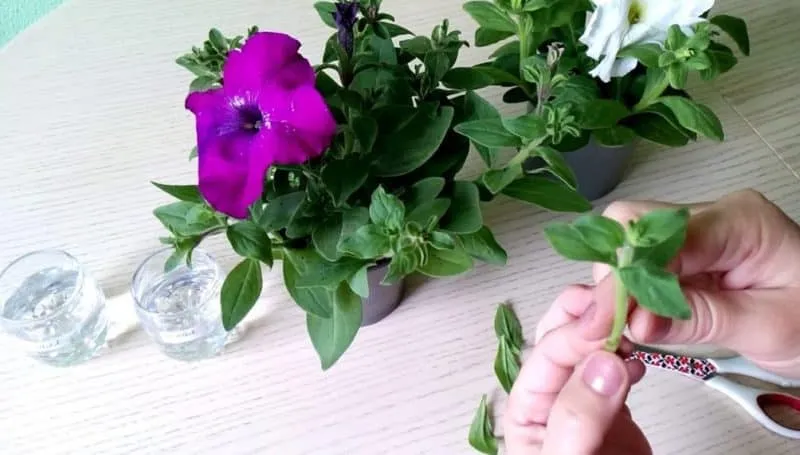
In late February or early March, cuttings 10–12 cm long are prepared. The top two leaves are cut in half, and the lower ones are completely removed. The cuttings are planted in the prepared substrate immediately after cutting. The soil should be loose and nutritious. The cuttings are buried 4-5 cm deep, spaced 2-3 cm apart. The boxes are covered with film or a glass jar.
Some gardeners set up an improvised greenhouse: bend a thick wire into an arch and stretch film over it. The container is placed on a shaded windowsill, maintaining a daylight duration of at least 10 hours. The cover is periodically removed, and the cuttings are sprayed with warm, settled water. Water is poured into the tray to prevent blackleg disease, which usually develops with excessive direct watering.
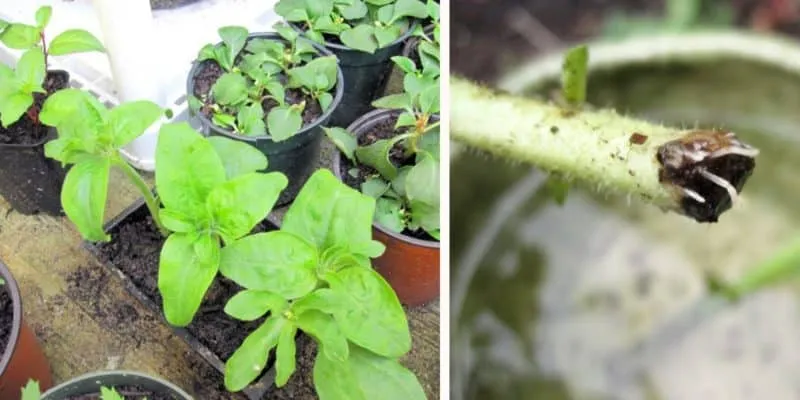
After the first leaves appear, the cuttings are transplanted into hanging pots for permanent placement. If the petunias are to be grown outdoors, transplantation is postponed until May. The plant does not like frequent repotting and responds with stunted growth and weak flowering. Therefore, it is best to decide on the growing location in advance.
For planting petunias in their permanent location, a high-quality, ready-made potting mix with a loose structure is used. For a homemade mix, gardeners take 2 parts turf, 1 part peat, and 1 part river sand, adding a few handfuls of perlite. The components are mixed in a large container, watered with a pink potassium permanganate solution, and 20–30 g of superphosphate is added per 10 litres. Loose soil allows moisture to pass through easily without pooling around the roots.
Tip! Instead of regular peat, use coconut coir. Its fibrous structure loosens heavy soil well and provides the plant with nutrients.
Petunias are often grown in ceramic or plastic hanging pots or wooden boxes. The material of the container does not matter much; what’s important is that there are drainage holes at the bottom. A layer of expanded clay or a moisture-absorbing sponge is placed at the bottom. The prepared soil mix is added, and a hole is made. The seedlings are carefully removed from their pots and planted with the root ball at ground level, neither too deep nor too high.
If the hanging pots are placed in direct sunlight, the soil will dry out and crack. In this case, the containers are filled halfway with soil, and the rest is topped up with peat or coconut coir. Petunias grow quickly and can protect their roots from drying out, but this planting method helps retain moisture in the early stages.
Trailing petunias have an extensive root system that needs enough space to grow. The optimal pot size for one plant is 5 litres. In a pot that’s too small, the petunia will be pale and weak, with thin shoots and small buds. Several plants can be planted in one pot if there is enough space for their growth. Some trailing petunia varieties have compact root systems, so they coexist well with others. The most compatible companion plants are alyssum and lobelia.
Care specifics
Caring for trailing petunias is simple, regardless of the variety. The plant loves sunlight, abundant watering, and misting, especially in hot weather. When watering or misting, avoid getting water on the buds and flowers. In dry weather, the plants are watered in the morning and evening. The root ball should be thoroughly soaked until water drains from the bottom.
Petunias in hanging pots with peat or coconut coir should be soaked in a large basin of water once a week. Ensure the substrate is completely saturated.
Trailing petunias need a balance—the soil should not be too wet or too dry. Water again only when the top 2-3 cm of soil is dry. If a pinch of soil from the top layer feels dry when rubbed between your fingers, it’s time to water.
Tip! To reduce watering frequency, gardeners add water-retaining crystals to the soil, which hold moisture and release it to the roots as needed. This method reduces watering frequency by 2-3 times.
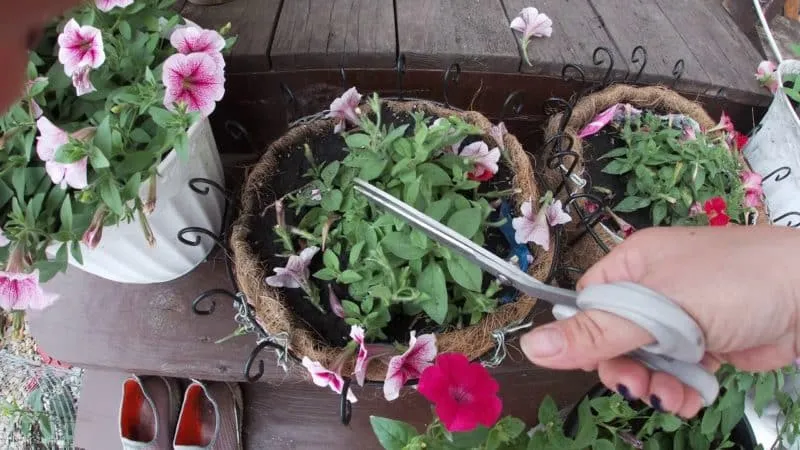
Remove dried flowers, leaves, seed pods, and long shoots 1-2 times a week. Some trailing petunia varieties grow chaotically, with shoots pointing in different directions. To maintain a neat shape and lush flowering, trim the bushes with sharp pruners. This does not harm the plant but keeps it healthy and attractive.
Fertilise with a balanced fertiliser once a week. Potassium and phosphorus should dominate the composition. Petunias from the Potunia group should be fertilised with every watering, reducing the solution concentration to 2-3 g/l. Without this, a beautifully formed, lush cascade of flowers cannot be achieved.
Use any liquid fertiliser for flowering plants. The concentration should not exceed 5 g per 10 litres of water.
Do not fertilise dry soil, as this can burn the roots. Combine watering and fertilising, or follow this rule: water in the morning, fertilise in the evening.
Pinching trailing petunias
Pinching trailing petunias is a mandatory procedure. The first time it is done when the central shoot reaches 15–20 cm in height. If done too early, the side shoots will stretch excessively, and the central part will stop growing.
Remove spent flowers and seed pods once a week. This is essential; otherwise, the plant will enter the fruiting phase and direct all its energy into seed production. New buds will not form, and the plant will lose its decorative appeal.
After heavy rain or during cold spells, the roots may begin to rot, and the shoots may grow excessively. Therefore, it is important to pinch out elongated stems and deformed buds.
Note. For trailing varieties, it is beneficial when the bushes spread outward, producing many young shoots. This increases the number of flowers and enhances their decorative effect.
Rules for pinching petunias:
- use sterilised tools—scissors or pruners;
- remove weak shoots carefully, without abrupt movements;
- trim all rotten and dry stems, flowers, and leaves.
After pruning, feed the plant with mineral fertilisers (e.g., "Flower Garden," "Agrecol") and growth stimulants (e.g., "Root Boost," "Epina," "Zircon").
How to pinch for lush petunias
For flowering trailing petunias, shape the tops by trimming side shoots. Plants that have already been pinched at the seedling stage are planted in their permanent location, as they produce new shoots more actively. Gardeners approach this creatively, shaping the plant as desired. Shoots can be left long, cascading down like a colourful waterfall, or trimmed into a neat cap. Regular pinching and removing weak stems promote lush flowering.
Pinching seedlings
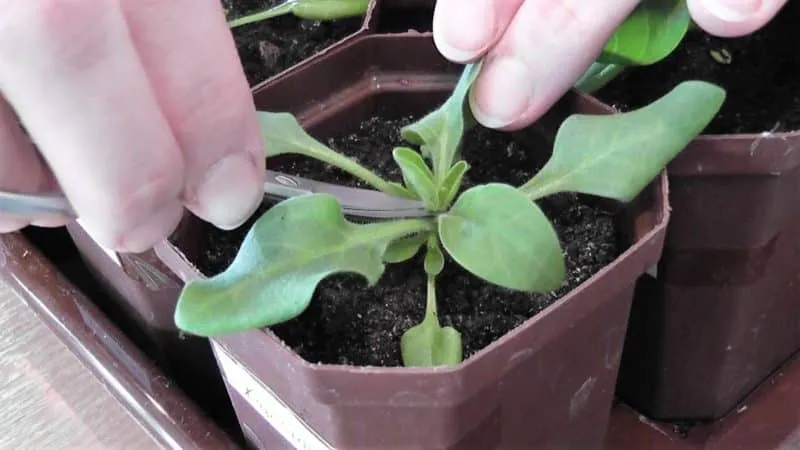
The first pinching of seedlings is done 70–75 days after sowing. The seedlings should have 5-6 true leaves. Use nail scissors or a sharp knife. Pinching by hand is not recommended, as it risks damaging the delicate sprouts and introducing infection.
A second pinching for lush flowering, active branching, and more buds is done after 30 days. Too frequent pinching weakens the plant and slows growth.
How to shape trailing petunias
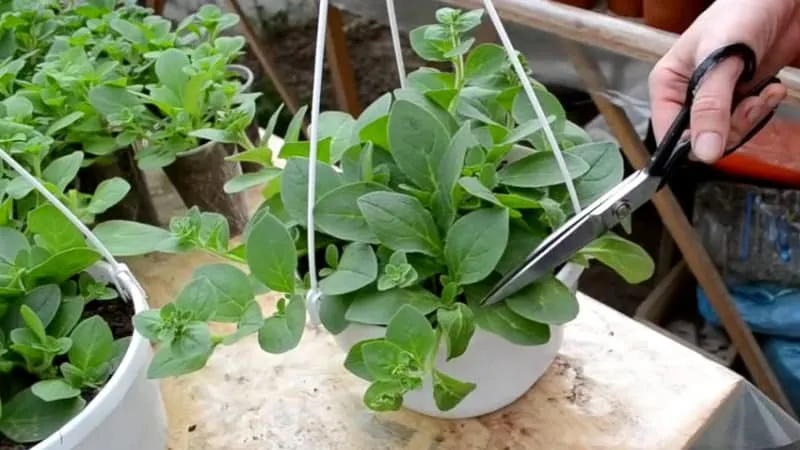
Sometimes, even with careful care, trailing petunias develop bare lower stems, with new buds and leaves only at the tops. In such cases, emergency pinching is recommended. Gardeners remove 2/3 of the shoot, leaving the plant almost bare. If only the top is removed, new buds will appear at the ends, and the bare part will remain.
Shaping is done in two stages to avoid completely denuding the pot. First, trim 2 shoots; after 7 days, trim 2 more; finally, trim the remaining stems. This ensures the plant always has flowering shoots while new ones gradually emerge.
For slower shaping, pruning is used instead of pinching. Leave 2-3 nodes above the soil. New shoots will grow from them, and after 10–14 days, the plant will bush out and bloom profusely.
What to do if it grows upward
Trailing petunias stretch upward when seedlings lack light. On cloudy days, use grow lights around the clock, dimming them at night. Place the lights 25 cm from the plants. The air temperature should be +25°C.
Warning! For mature seedlings, such lighting and temperature are harmful: the shoots stretch excessively and may die. To fix this, move the pots to a cooler location.
Thin out dense bushes or remove weak plants. Dense seedlings should be transplanted into separate pots and kept at +18°C.
How to prune the plant
To prune petunias correctly, use pruners or a sharp knife. Sterilise tools with potassium permanganate or rubbing alcohol.
For faster recovery, follow these rules:
- remove 3-4 cm from the top of each stem;
- prune in the morning or evening;
- place cuttings in water to prevent drying out.
For a cascading effect, trim thin trailing stems by half in July, when the plant won’t regrow long shoots. Trailing varieties are trimmed when they lose their decorative appeal.
Prune 2-3 days before fertilising to provide extra nutrients and encourage lush flowering.
Cuttings can be used for propagation. They root easily, especially with "Root Boost" solution.
Propagation
Trailing petunias are propagated by seeds or cuttings. The first method is labour-intensive due to the tiny seeds. Some gardeners sow on snow, which melts and carries the seeds into the soil. Transplant after 5-6 leaves appear.
Green cuttings are the preferred method for trailing petunias. Take 5-6 cm cuttings from mature shoots. Rooting in peat pellets takes 1-2 months. "Humate" or "Epina" speeds up rooting.
Pest and disease control
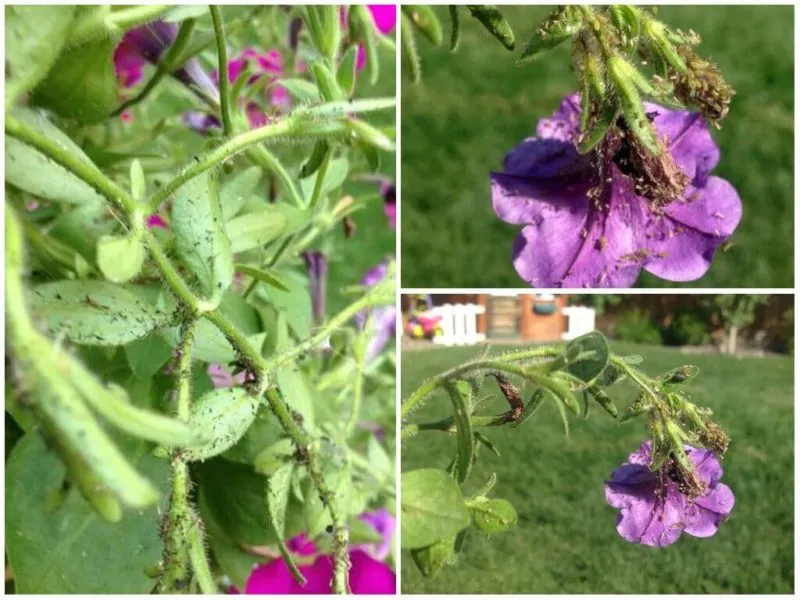
Trailing petunias are generally healthy but may attract pests in poor conditions. Common pests include aphids, spider mites, and thrips. Early intervention is key.
Spider mites leave fine webs on leaves. Thrips damage leaves and pollen. Aphids spread quickly, feeding on plant sap.
Use systemic insecticides like "Teppeki," "Actara," or "Confidor" as directed.
Tips from experienced gardeners
For abundant flowering, follow these expert tips:
- Some trailing petunias are genetically programmed to stop central stem growth, producing only side shoots. Popular varieties: Easy Wave, Tidal Wave, Rose Vein Velvet, Opera. Others need central stem pinching for bushiness. The earlier the pinching, the better the results.
- Remove dry and wilted flowers regularly, and trim old branches short to rejuvenate the plant.
- Shape young plants when they have 2-3 pairs of true leaves. Pinch the central stem first, then the sides. Frequent pinching increases bushiness.
- Repeat pinching after a month when side shoots appear.
- For large, vibrant blooms, fertilise with balanced fertilisers.
Conclusion
Growing trailing petunias is easy, even for beginners. Use seeds or cuttings for planting. Choose loose, well-draining soil and pots with drainage holes. The secret to lush blooms is proper pinching and pruning. These techniques encourage dense growth and abundant flowering. New shoots grow thick and strong, leaves become broad and fleshy, and flowers display vibrant colours.