The cultivated potato plant offers numerous propagation methods, each with its own advantages and disadvantages. The choice of agronomic techniques depends on growing conditions, as well as the quality and quantity of seed material available.
Alternative methods are employed when additional objectives are pursued, such as increasing yield or conserving seed material.
Table of contents
How Potatoes Propagate
European agricultural innovators increasingly employ new technologies, farming techniques, and unconventional methods in potato cultivation.
These include the following approaches:
- tuber division (a long-known method that was primarily used during lean years);
- propagation via potato sprouts;
- green shoot cuttings;
- seed sowing for seedlings or direct outdoor planting;
- seedling production from "eyes";
- skin propagation;
- rooting layers;
- dividing the bush;
- combined methods.
All these techniques serve as worthy alternatives to traditional cultivation methods.
What Is the Name for Propagation Using Tubers?
The conventional method of potato propagation involves planting tubers. This vegetative approach is considered the most reliable and least labor-intensive. Its only significant drawback is its inefficiency in terms of material usage.
Alternative methods guarantee not only good yields but also substantial savings on planting material.
Propagation Methods: Advantages and Disadvantages of Each
The potato is such a resilient crop that nearly all its parts can be used for propagation and yield production. The key is providing the necessary conditions for each specific method.
Tuber Division
Gardeners employ this method when facing a shortage of planting material or when needing to rapidly propagate a particular variety.
Important. Only large tubers that have undergone vernalization — sprouting for 2-3 weeks at 18-25°C with diffused daylight — should be used for division. On such material, the awakened buds ("eyes") are clearly visible, and the sprouts that emerge during vernalization become sturdy without excessive elongation.
Method 1 (simple):
- Selected tubers are divided into several parts, ensuring each fragment contains at least one "eye."
- The cuts are dusted with wood ash.
- Prepared fragments are planted in soil just like whole tubers.
- Care follows standard tuber planting procedures.
Method 2 (advanced):
- Selected tubers (not yet vernalized) are placed on moist fabric or in boxes with damp sawdust (3-6 cm layer).
- Maintained at room temperature (minimum 18°C).
- Substrate moisture is maintained by twice-daily warm water spraying.
- Diffused daylight exposure is recommended.
- Tubers remain in these conditions until sprouts reach 5 cm (approximately 2-3 weeks). Longer sprouts risk damage during handling.
- Prepared tubers are divided into small fragments, each containing an "eye" with a well-developed sprout.
- Cuts are treated with wood ash.
- Fragments are planted using standard tuber planting methods.
- Care follows conventional whole-tuber planting practices.
Due to the small size of planting material, soil condition is crucial. It must not dry out or form a crust, nor should it become waterlogged.
Advantages: conservation of planting material and good yield (Method 2 may produce significantly higher yields).
Disadvantages: more labor-intensive than conventional tuber planting.
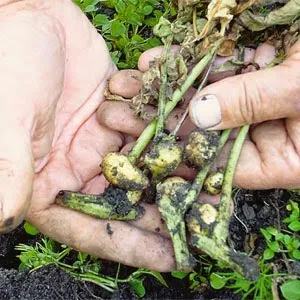
Sprout Propagation
This method produces high-quality sprouts within approximately two months.
Technique:
- Determine sprouting start time by counting back 60 days from typical potato emergence dates. Alternatively, base timing on planting schedules while ensuring protection from late frosts.
- Maintain optimal temperature (12-15°C) to produce robust sprouts capable of forming viable seedling bushes.
- Sprouting accommodates two light regimes: dark and light. Dark conditions produce faster but thinner, colorless sprouts. Light conditions yield slower but sturdier growth. Both methods produce viable material.
- Maintain adequate humidity to prevent drying of growth points. Best achieved by placing tubers on thick moist fabric or sawdust with periodic spraying.
- While tubers sprout, prepare loose, fertile soil mixture for sprouts.
- Potato bud awakening occurs unevenly, with apical "eyes" activating first. Sprout readiness indicators: matchbox-sized length; root primordia bumps visible at base.
- Mature sprouts are carefully detached from tubers with gentle twisting.
- Before planting, dip sprout bases in wood ash for micronutrient supply and disinfection.
- Planting options include indoor boxes, warm greenhouses, or (in mild climates) open ground under plastic covers.
- Space seedlings 6-7 cm apart in grid pattern. Planting depth varies with sprout length — approximately two-thirds should be buried.
- Water thoroughly to ensure soil contact with sprouts.
- Provide shade for new plantings.
- Establishment takes about one week, followed by greenery emergence. Gradually acclimate plants to sunlight over three days before full exposure. Subsequently, vigorous growth occurs.
- After three weeks, robust seedlings are ready for outdoor transplanting at spacing appropriate for the variety.
Advantages: significant planting material savings with high yields.
Note. Used tubers can undergo secondary sprouting.
Disadvantages:
- substantial time and labor investment;
- technique failures may result in complete loss of planting material.
Green Cuttings
Potato propagation via cuttings remains uncommon.
Technique:
- Plant sprouted potatoes using standard spacing or slightly wider. Schedule planting two weeks earlier than regional norms.
- At emergence, fertilize with nitrogen-phosphorus-potassium solution (1 tbsp each per 10L water, 200mL per plant).
- When shoots reach 7-10 cm, perform first hilling.
- Repeat identical fertilization after two weeks.
- Hill plants again as they grow.
- Regularly weed and aerate soil. Water as needed and regulate temperature using plastic covers.
- At 15-20 cm height, pinch tops to stimulate axillary bud growth for cuttings.
- Harvest cuttings during mass flowering for optimal rooting. Use blade to remove axillary shoots, dividing into segments with intact internodes and leaves.
- Soak cuttings in biostimulant (e.g., RootBoost or similar European products) according to package instructions to accelerate root formation.
- Plant treated material conventionally, water thoroughly, and shade initially.
- Provide standard care thereafter.
Advantages:
- substantial planting material savings;
- rapid propagation of rare or desirable varieties.
Attention. Yield depends on rooting timing and growing conditions.
Disadvantages:
- significant labor requirements;
- first-year harvest consists only of small (seed) potatoes.
Seed Propagation
This method serves both professional breeders and experimental gardeners.
Material comes from seeds developing in green berries post-flowering.
Technique:
- In early March (for central Europe), place seeds on moist paper towels in transparent lidded containers at 20-25°C.
- Ventilate daily for 1-2 minutes, misting as needed.
- After two weeks, plant germinated seeds in nutrient-rich soil. Surface-sow on lightly compacted, moistened substrate, cover lightly, mist, and place in warm, bright location.
- Transplant after 3-4 weeks. Water as soil dries, occasionally aerate roots, and fertilize monthly with complete fertilizer.
- Harden seedlings by moving to enclosed balcony or greenhouse.
- Transplant outdoors only after frost danger passes, preferably on overcast days.
- Choose new potato-free locations to avoid soilborne diseases.
- Space plants 20x60 cm, burying deeply with only top leaves exposed. Long stems may be planted horizontally.
- Water thoroughly and shade with cover material until establishment.
- Maintain through weeding, hilling, and supplemental watering/fertilization.
Direct May sowing produces seed potatoes (small tubers for next year's planting).
Advantages:
- disease-free planting material;
- potential for beneficial hybrid traits.
Disadvantages:
- time and labor intensive;
- lack varietal purity due to genetic segregation;
- unpredictable outcomes.
"Eye" Propagation
A single "eye" with minimal adjacent tissue suffices for new plant growth, enabling dual use — consumption of main tuber and propagation from waste material.
Technique:
- Begin preparation 1-2 weeks before regional planting dates.
- Sterilize narrow-bladed knife.
- Excise "eyes" with approximately 1 cm surrounding tissue.
- Place excised buds on paper towels for week-long incubation at 18-22°C with moderate humidity until cuts cork over and roots/sprouts emerge.
- Daily heat treatment (2 hours at 40°C) eliminates pathogens.
- Plant prepared "eyes" after frost danger passes.
- Plant shallowly (~4 cm) at standard spacing.
- Initial care emphasizes moisture maintenance due to delicate root systems.
- After establishment, apply conventional cultivation techniques.
Advantages: minimal material requirements.
Note. Proper care can yield ~2 kg per "eye"-propagated plant.
Disadvantages: requires careful attention during early growth stages.
Skin Propagation
Like "eye" propagation, this method conserves whole tubers by utilizing sprouted peelings.
Technique:
- Begin collecting material 1-2 months before typical emergence. Select peelings with intact "eyes", storing in cool, bright location on moist sawdust, peat, or soil in boxes.
- Cover peelings with 2-3 cm substrate layer.
- Maintain moderate substrate moisture.
- Sprouts emerge after three weeks.
- At 6 cm height, sprouts develop adequate roots.
- Transplant seedlings outdoors using preferred spacing.
- Provide standard tuber-planting care.
Advantages: minimal material consumption.
Disadvantages: requires dedicated propagation space.
Combined Propagation Methods and Their Features
Propagation techniques combine effectively:
- Sprout-propagated tubers can subsequently be planted whole or divided — maximizing material efficiency.
- Winter indoor tuber planting produces spring seedlings suitable for green cuttings (early harvest).
- Early-harvested small tubers can be divided and replanted.
- Mother plants for cuttings can simultaneously produce layers by partially burying uncut stems.
Potato parts' viability and adaptability enable diverse experimental approaches.
Rapid Field Propagation Techniques
Employing multiple complementary methods increases likelihood of excellent yields.
Advanced combinations include:
- sprout propagation followed by detachment and planting;
- dividing used tubers by "eyes" for planting;
- bush division at 20 cm height;
- flowering-stage cutting collection and rooting.
This accelerated propagation maximizes yield potential from limited starting material.
Conclusion
Potatoes' versatile propagation capacity enables abundant harvests with modest inputs, rapid variety multiplication, and seed material conservation.
Diverse techniques and innovative combinations make cultivation both engaging and productive.